Creality Falcon A1 Pro Alignment Guides


Creality Falcon A1 Pro Alignment Guides - English
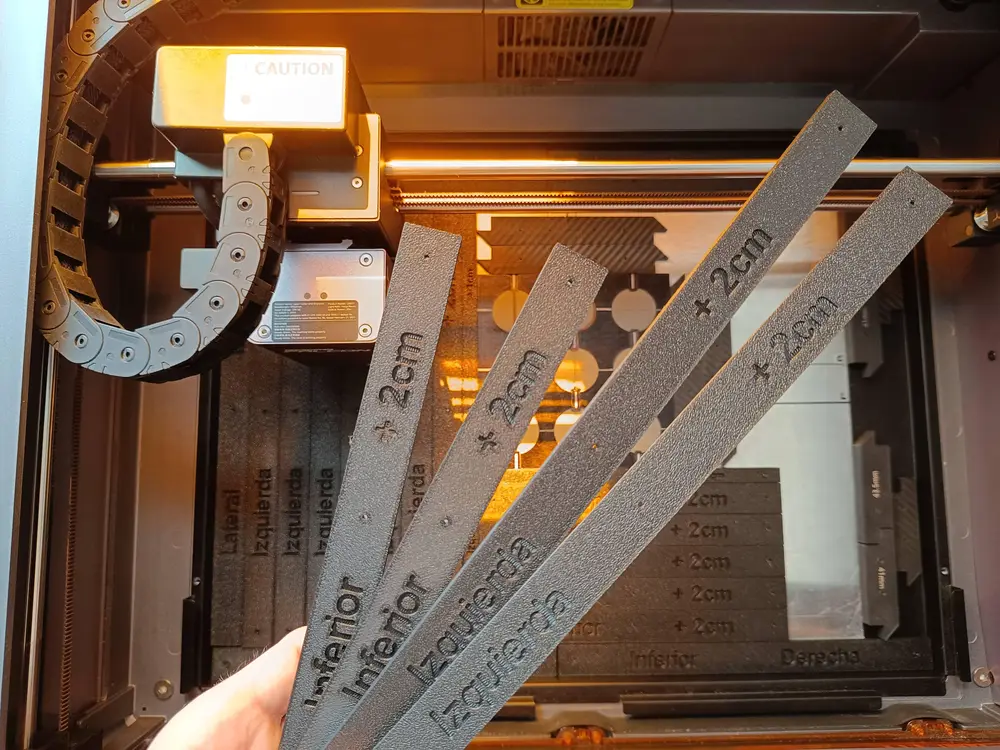
I've created parametric guides to center any object on the Creality Falcon A1 Pro's tray.
These guides allow you to position objects in the same way every time, preventing them from shifting during repetitive engraving and cutting tasks. Simply remember the number of side and bottom guides required for each application and tighten them to ensure the object remains firmly in the same position when switching to similar pieces for engraving/cutting.
The guides are placed in different locations; some are specifically for the outer frame, and others for the inner area. The inner guides come in two widths: 2 cm and 1 cm.
These guides have 6x2 magnets on their underside that are added later by applying pressure (the holes have a very tight tolerance so that glue is not needed and they have holes that allow a nail to be inserted to remove the magnets), to ensure that they adhere to the metal sheet of the tray and have a very low height that does not interfere with the laser head.
The 3mf file contains all the guides, placed upside down so that the top surface (where each guide's label is located) will have the texture of the print bed. You can print as many guides as you need for each application. I've also included a second 3mF guide with small 12x2 magnet guides to hold the JIGs.
In the photos, you can see that in addition to the guides, I have 0.5mm aluminum sheets on the tray with crosshairs marked on them with a marker. These crosshairs indicate the center position of the camera lens and the point where the laser for the A1 Pro's autofocus hits. I used these sheets for testing until I achieved optimal calibration and for engravings that need to cover the entire front surface of an object and extend beyond the margins, thus avoiding marking the original print tray.
I hope you find this useful and that it helps you use the Creality Falcon A1/A1 Pro more easily and efficiently for repetitive tasks.
Please share your photos and opinions; I'll be attentive to any details you can contribute about this design.
Creality Falcon A1 Pro - Guías de alineamiento de objetos
He creado unas guías paramétricas para centrar cualquier objeto en la bandeja de la Creality Falcon A1 Pro.
Con ellas se consigue poder poner los objetos en la misma posición siempre y conseguir que no cambie la posición al realizar tareas de grabado y corte de objetos repetitivas, solo es necesario recordar el número de guías laterales e inferiores que se usa para cada caso y apretarlas hacia cada lado para que estén firmes en la misma posición al cambiar a nuevas piezas similares para grabado/corte.
Las guías se colocan en diferentes partes, algunas son específicas para el marco exterior y otras para el área interior. Las interiores tiene dos medidas de ancho: 2cm y 1cm.
Estas guías disponen de imanes de 6x2 en su parte inferior que se añaden posteriormente haciendo presión (los orificios tienen una tolerancia muy justa para no necesitar pegamento y tienen unos agujeros que permiten introducir un clavo para sacar los imanes), para conseguir que se queden adheridas a la chapa metálica de la bandeja y tienen una altura muy baja que no interfiere con el cabezal del láser.
En el fichero 3mf están todas las guías, colocadas bocabajo para que la cara superior (donde están las etiquetas de cada una) cojan la textura de la bandeja de impresión. Se pueden imprimir todas las guías que se necesite para cada caso. También adjunto un segundo 3mf con unas guias pequeñas para imanes de 12x2 para sujetar los JIGs.
En las fotos podéis ver que además de las guías, sobre la bandeja tengo unas láminas de aluminio de 0.5mm en las que tengo marcado con rotulador unas crucetas, que indican la posición central del objetivo de la cámara y el punto donde incide el láser para el autofocus de la A1 Pro. Esta lamina la he usado para hacer pruebas hasta conseguir un resultado idóneo de calibración y para hacer grabados que deben llenar toda la cara frontal de un objeto y deben sobrepasar los márgenes y así evitar marcar la bandeja de serie.
Espero que os sea útil y os ayude a usar la Creality Falcon A1/A1 Pro de una forma más fácil y idónea en tareas repetitivas.
Compartir vuestras fotos y opiniones, estaré atento a cualquier detalle que podáis aportar sobre este diseño.
You are prohibited from sharing, sub-licensing, selling, renting, hosting, transferring, or distributing the digital file or 3D printed versions of this object, as well as any other derivative work in either digital or physical form (including remixes).You are not allowed to use the objects in any manner that involves charging money or collecting fees without permission.