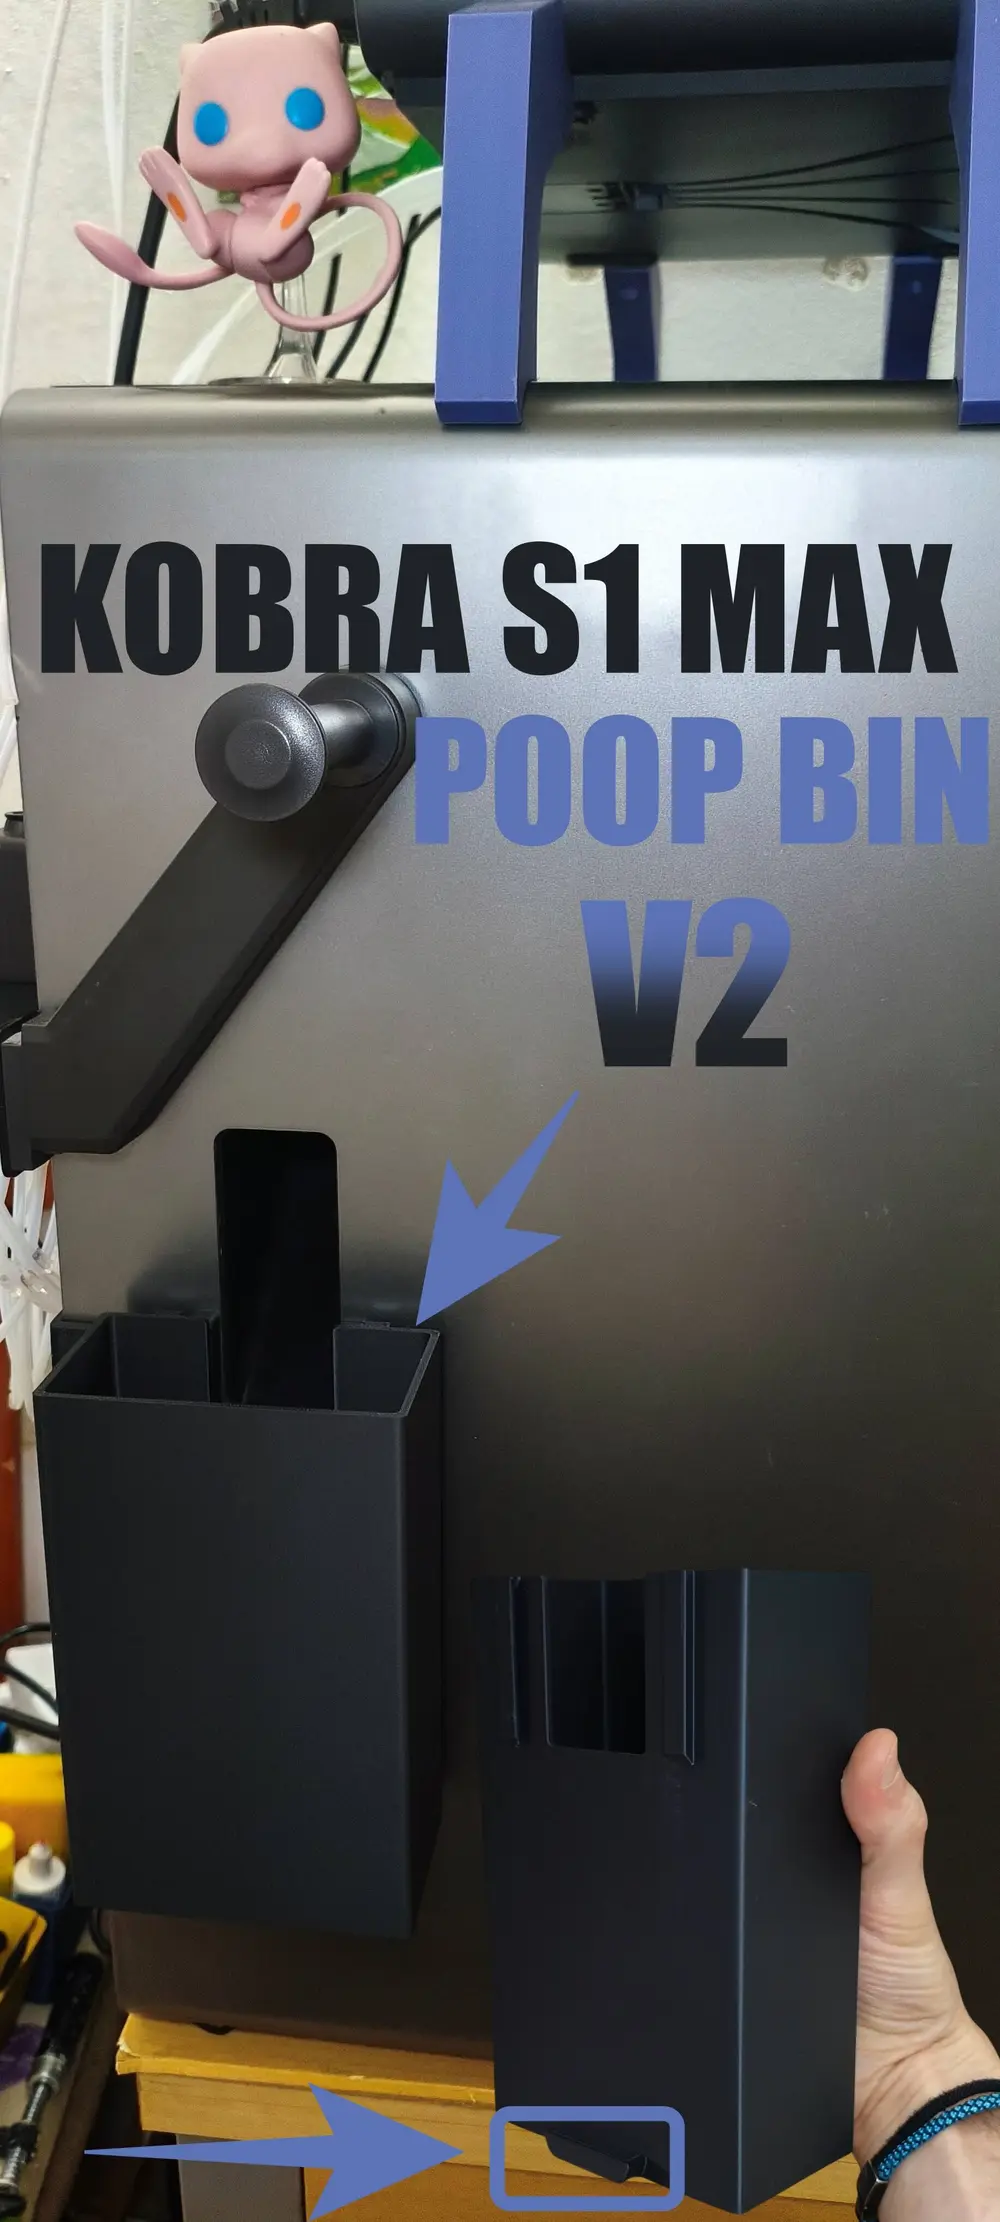
Kobra S1 Max - Poop bin


LAST UPDATE:
- 10/10/2026 - V2 - The weight of the Poop Bin causes the support bracket (which is only secured with a single screw and a small piece of double-sided tape) to pull away from the printer. I have updated the Poop Bin model to add a small tab at the bottom that keeps everything firmly in place. I have also made some minor millimetric adjustments to improve the fit of the support bracket.
-----------------------------------------------------------------------------------------------------------------------------------------------------------------------------------
Don’t know what to do with your Kobra S1 Max “poops”?
During nozzle purges and cleaning routines, filament scraps end up falling through the waste chute… and often get scattered across your desk, the floor, or even inside your cabinet. With this bin and its dedicated mount, you can collect all that waste cleanly and neatly.
This is my waste bin design with a dedicated mount for the waste outlet of the Anycubic Kobra S1 Max 3D printer. It is designed to be placed directly at the exit where the printer expels excess material, automatically collecting all purge leftovers.
✅ Practical and functional design:
The set consists of two parts:
- A mount that attaches using one of the rear panel screws (It is divided into two pieces to facilitate printing)
- A removable bin for easy waste disposal.
The bin slides into the mount, allowing you to remove it comfortably for emptying without disassembling anything.
🧱 Recommended material:
PLA will be sufficient in most situations.
For increased durability, printing in PETG, ABS, or ASA is recommended.
🛠️ Assembly:
1) Join the two parts that make up the mount. The tolerance is very tight, so you will need to apply pressure to fit them together. To secure the assembly between the parts, you can add a few drops of glue. (Image 3)
2) The mount is secured with a single screw on the rear panel of the printer.
3) For a firmer fit and to prevent any play, you can add a small piece of double-sided tape between the mount and the panel. This is not mandatory, but it helps keep everything perfectly snug and stable.
4) Once the mount is fixed, simply slide the bin into place and you're done.
A simple yet very practical solution to keep your printing area clean and organized, preventing filament waste from accumulating where it shouldn’t.
I hope this design is as useful for you as it has been for me on my Kobra S1 Max!
IF YOU WOULD LIKE A DIFFERENT SIZE FOR THE BIN, FEEL FREE TO MESSAGE ME
------------------------------------------------------------------------------------------------------------------------------------------------------------------------------------------------------------------------------------------------------------
¿No sabes que hacer con las “cacas” de tu Kobra S1 Max?
Durante las purgas y limpiezas del nozzle, los restos de filamento acaban cayendo por el conducto de salida… y muchas veces terminan repartidos por la mesa, el suelo o incluso dentro del mueble. Con esta papelera y su soporte específico podrás recoger todos esos residuos de forma limpia y ordenada.
Este es mi diseño de papelera con soporte para el conducto de salida de residuos de la impresora 3D Anycubic Kobra S1 Max. Está pensado para colocarse directamente en la salida donde la impresora expulsa el material sobrante, recogiendo automáticamente todos los restos de purga.
✅ Diseño práctico y funcional:
El conjunto está compuesto por dos piezas:
- Un soporte que se fija con uno de los tornillos del panel trasero (está dividida en dos partes para facilitar su impresión).
- Una papelera extraíble para vaciar fácilmente los residuos.
La papelera se desliza en el soporte, lo que permite retirarla cómodamente para vaciarla sin desmontar nada.
🧱 Material recomendado:
PLA será suficiente en la mayoría de situaciones.
Para más resistencia se recomienda imprimir en PETG, ABS o ASA.
🛠️ Montaje:
1) Unir las dos piezas que conforman el soporte. La tolerancia es muy apretada, por lo que deberás hacer presión. Para asegurar el montaje entre las piezas puedes agregar unas gotitas de pegamento. (Imagen 3)
2) El soporte se fija con un único tornillo en el panel trasero de la impresora.
3) Para un ajuste más firme y evitar cualquier holgura, se puede añadir un pequeño trozo de cinta de doble cara entre el soporte y el panel. No es obligatorio, pero ayuda a que quede perfectamente pegado y estable.
4) Una vez fijado el soporte, simplemente introduce la papelera en su guía y listo.
Una solución sencilla pero muy práctica para mantener tu zona de impresión limpia y organizada, evitando que los restos de filamento se acumulen donde no deben.
¡Espero que este diseño te sea tan útil como lo ha sido para mí en mi Kobra S1 Max!
SI QUIERES ALGÚN TAMAÑO DISTINTO PARA LA PAPELERA, NO DUDES EN ESCRIBIRME