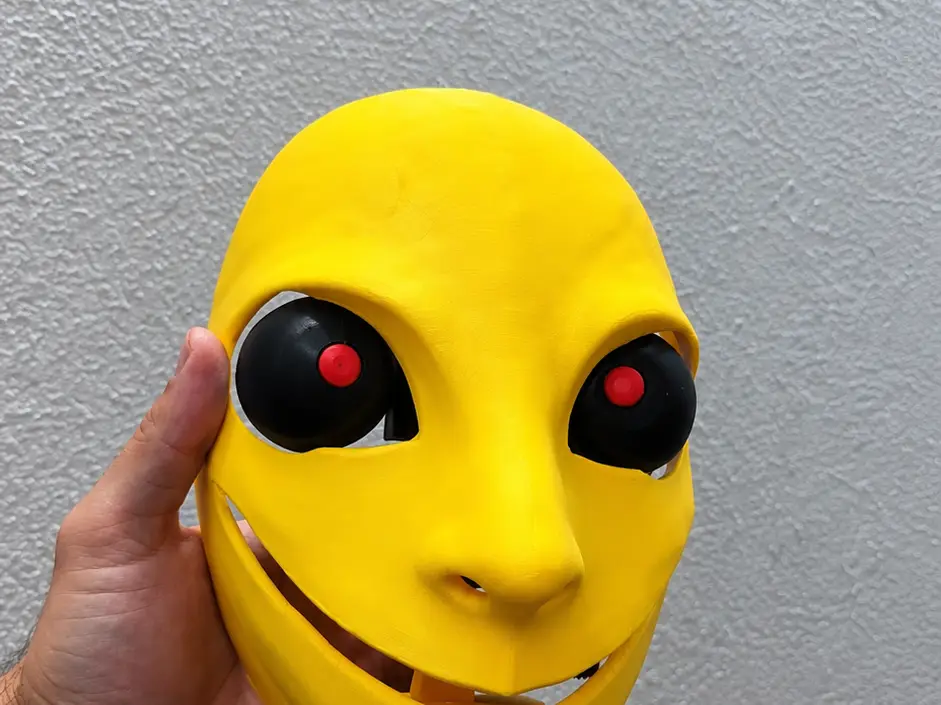
Halloween animatronic mask - easy


Turn a 3D printed Halloween mask into a simple animatronic project!
Youtube: https://youtube.com/shorts/XTwr7t9wOFc?feature=share
Sorry, your browser doesn't support embedded videos. 抱歉,浏览器不支持 video 视频
This project is designed to be easy to build, inexpensive and beginner-friendly, using only two small 9g servos and an ESP32-C3 Mini to control the movement of the eyes.
The mask features two independently controlled moving eyes, creating different animations that make the mask look alive.
No complicated electronics or expensive controllers are required.
Features
•
Fully 3D printed mask
•
2 × 9g micro servos
•
ESP32-C3 Mini
•
ESP32-C3 Mini expansion board for easier wiring
•
Moving left and right eyes
•
5 different eye animations
•
Animations automatically run one after another
•
Each animation lasts approximately 5–6 seconds
•
Can be powered by a battery or USB cable
•
Easy to modify and customize
•
Suitable for Halloween, cosplay, robotics and animatronic projects
The two servos are connected independently, allowing the eyes to move together or in opposite directions.
Required Components
Electronics
•
1 × ESP32-C3 Mini
•
1 × ESP32-C3 Mini expansion board
•
2 × 9g micro servos
•
1 × 5V power source
For power, you can use either:
•
a USB power bank / USB cable
•
a suitable 5V battery solution
Other
•
3D printed mask
•
3D printed eye components
•
Small screws or suitable servo mounting hardware
•
Optional hot glue or epoxy for securing components
Servo Connections
The project uses:
Servo 1 – Left eye
•
Signal - GPIO 2
•
VCC - 5V
•
GND - GND
Servo 2 – Right eye
•
Signal - GPIO 3
•
VCC - 5V
•
GND - GND
Important
The servos should be powered from a suitable 5V supply.
Do not try to power both 9g servos from the ESP32 3.3V output.
If using an external 5V supply, connect:
Power supply GND - ESP32 GND
The ESP32 and servos must have a common ground.
How the Animations Work
The program contains five different animations.
Animation 1 – Fast synchronized movement
Both eyes move together from side to side at relatively high speed.
Animation 2 – Slow synchronized movement
Both eyes move together, but much more slowly, creating a calmer movement.
Animation 3 – Opposite movement
The two eyes move in opposite directions.
For example:
Left eye → right
Right eye → left
Then they reverse direction.
Animation 4 – Alternating movement
One eye moves while the other remains approximately centered. Then they switch.
Animation 5 – Random movement
The eyes move to different randomly selected positions, creating a less predictable and more natural animatronic effect.
After all five animations have finished, the sequence starts again.
Arduino IDE
The ESP32 can be programmed directly using Arduino IDE.
Install the ESP32 board support and select the appropriate ESP32-C3 board.
The code uses the modern ESP32 LEDC PWM system, so it does not require the old ledcSetup() / ledcAttachPin() functions.
Arduino Code
// ========================================== // EASY HALLOWEEN ANIMATRONIC MASK // ESP32-C3 MINI // // Left eye -> GPIO 2 // Right eye -> GPIO 3 // // 2 x 9g servo // ==========================================
#define SERVO_LEFT 2 #define SERVO_RIGHT 3
#define SERVO_FREQ 50 #define SERVO_RESOLUTION 14
// Eye positions const int CENTER = 90; const int LEFT = 55; const int RIGHT = 125;
// ========================================== // SETUP // ==========================================
void setup() {
Serial.begin(115200);
ledcAttach(SERVO_LEFT, SERVO_FREQ, SERVO_RESOLUTION); ledcAttach(SERVO_RIGHT, SERVO_FREQ, SERVO_RESOLUTION);
servoWrite(SERVO_LEFT, CENTER); servoWrite(SERVO_RIGHT, CENTER);
delay(1000); }
// ========================================== // MAIN LOOP // ==========================================
void loop() {
animation1(); animation2(); animation3(); animation4(); animation5();
delay(1000); }
// ========================================== // SERVO CONTROL // ==========================================
void servoWrite(int pin, int angle) {
angle = constrain(angle, 0, 180);
// Approximate pulse range for a 9g servo int pulse = map(angle, 0, 180, 500, 2400);
// 50 Hz = 20,000 microseconds // 14-bit resolution = 16383 uint32_t duty = ((uint32_t)pulse * 16383) / 20000;
ledcWrite(pin, duty); }
// ========================================== // ANIMATION 1 // FAST SYNCHRONIZED MOVEMENT // ==========================================
void animation1() {
Serial.println("Animation 1 - Fast");
unsigned long start = millis();
while (millis() - start < 5500) {
// Center -> Right for (int a = CENTER; a <= RIGHT; a += 2) {
servoWrite(SERVO_LEFT, a); servoWrite(SERVO_RIGHT, a);
delay(12); }
// Right -> Left for (int a = RIGHT; a >= LEFT; a -= 2) {
servoWrite(SERVO_LEFT, a); servoWrite(SERVO_RIGHT, a);
delay(12); }
// Left -> Center for (int a = LEFT; a <= CENTER; a += 2) {
servoWrite(SERVO_LEFT, a); servoWrite(SERVO_RIGHT, a);
delay(12); } } }
// ========================================== // ANIMATION 2 // SLOW SYNCHRONIZED MOVEMENT // ==========================================
void animation2() {
Serial.println("Animation 2 - Slow");
unsigned long start = millis();
while (millis() - start < 5500) {
for (int a = CENTER; a <= RIGHT; a++) {
servoWrite(SERVO_LEFT, a); servoWrite(SERVO_RIGHT, a);
delay(35); }
for (int a = RIGHT; a >= LEFT; a--) {
servoWrite(SERVO_LEFT, a); servoWrite(SERVO_RIGHT, a);
delay(35); }
for (int a = LEFT; a <= CENTER; a++) {
servoWrite(SERVO_LEFT, a); servoWrite(SERVO_RIGHT, a);
delay(35); } } }
// ========================================== // ANIMATION 3 // OPPOSITE MOVEMENT // ==========================================
void animation3() {
Serial.println("Animation 3 - Opposite");
unsigned long start = millis();
while (millis() - start < 5500) {
// Eyes move in opposite directions
for (int a = 0; a <= 35; a++) {
servoWrite(SERVO_LEFT, CENTER + a); servoWrite(SERVO_RIGHT, CENTER - a);
delay(25); }
for (int a = 35; a >= -35; a--) {
servoWrite(SERVO_LEFT, CENTER + a); servoWrite(SERVO_RIGHT, CENTER - a);
delay(25); }
for (int a = -35; a <= 0; a++) {
servoWrite(SERVO_LEFT, CENTER + a); servoWrite(SERVO_RIGHT, CENTER - a);
delay(25); } } }
// ========================================== // ANIMATION 4 // ALTERNATING EYES // ==========================================
void animation4() {
Serial.println("Animation 4 - Alternating");
unsigned long start = millis();
while (millis() - start < 5500) {
// Left eye moves
for (int a = CENTER; a <= RIGHT; a++) {
servoWrite(SERVO_LEFT, a); servoWrite(SERVO_RIGHT, CENTER);
delay(20); }
for (int a = RIGHT; a >= LEFT; a--) {
servoWrite(SERVO_LEFT, a); servoWrite(SERVO_RIGHT, CENTER);
delay(20); }
// Right eye moves
for (int a = CENTER; a <= RIGHT; a++) {
servoWrite(SERVO_LEFT, CENTER); servoWrite(SERVO_RIGHT, a);
delay(20); }
for (int a = RIGHT; a >= LEFT; a--) {
servoWrite(SERVO_LEFT, CENTER); servoWrite(SERVO_RIGHT, a);
delay(20); } } }
// ========================================== // ANIMATION 5 // RANDOM / NATURAL MOVEMENT // ==========================================
void animation5() {
Serial.println("Animation 5 - Random");
unsigned long start = millis();
while (millis() - start < 5500) {
int targetLeft = random(60, 121); int targetRight = random(60, 121);
int currentLeft = CENTER; int currentRight = CENTER;
int duration = random(300, 800); int steps = 30;
for (int i = 0; i <= steps; i++) {
int leftPosition = map(i, 0, steps, currentLeft, targetLeft);
int rightPosition = map(i, 0, steps, currentRight, targetRight);
servoWrite(SERVO_LEFT, leftPosition); servoWrite(SERVO_RIGHT, rightPosition);
delay(duration / steps); } }
servoWrite(SERVO_LEFT, CENTER); servoWrite(SERVO_RIGHT, CENTER); }
Assembly
1.
Print all the mask components.
2.
Install the two 9g servos inside the head/mask structure.
3.
Connect the first servo to the mechanism controlling the left eye.
4.
Connect the second servo to the mechanism controlling the right eye.
5.
Make sure both eye mechanisms can move freely without touching the mask.
6.
Connect the servo signals:
7.
Connect both servo grounds to GND.
8.
Connect the servo power to a suitable 5V supply.
9.
Install the ESP32-C3 Mini on the expansion board to make wiring easier.
10.
Upload the Arduino program.
11.
When powered on, both eyes initially move to the center position.
12.
The five animations then run automatically in sequence.
Mechanical Setup
Before permanently fixing the servo horns, upload the program and let both servos move to 90° (center position).
Then install the servo horns so that the eyes are approximately centered.
This is important because the physical center of the servo mechanism depends on how the horn and eye mechanism are installed.
The software intentionally limits the normal movement to approximately:
55° - 125°
rather than using the full 0–180° servo range. This helps prevent the mechanism from hitting the physical limits of the mask.
您不得分享、转授权、出售、出租、托管、转让或分发该数字文件或该对象的3D打印版本,以及以数字或物理形式存在的任何其他衍生作品(包括混音)。未经许可,您不得以任何方式使用这些物品进行费用收取。