
2026-02-03 00:43:20
29.4k
2k
Magnum v2 - Magnetic Kobra S1 printhead cover

@BesbesCat_3341887
Donate
Message
Follow
Recommended printing method
Add
ASA v2.1
Kobra S1
Kobra 3
、
Kobra 2
、
Kobra 2 Plus
、
Kobra 2 Neo
、
Kobra 2 Pro
、
Kobra 2 Max
、
Kobra 3 Max
、
Kobra 3 V2
、
Kobra X
/ Plates:3
/ 5h12m
PETG v2.1
Kobra S1
Kobra 3
、
Kobra 2
、
Kobra 2 Plus
、
Kobra 2 Neo
、
Kobra 2 Pro
、
Kobra 2 Max
、
Kobra 3 Max
、
Kobra 3 V2
、
Kobra X
/ Plates:3
/ 4h44m
519
Share


Description
Following up on my last design, this one brings the ultimate upgrade to your Kobra S1 printhead, both in terms of usability and performance.
Here's a full video for this printhead along with the Flowtech hotend and the Flowtech optimized duct completing a good quality benchy in under 10 minutes.
Features:
- Magnetic attachment. Uses 4 stacked magnets per side instead of one to achieve greater clamping force. This reduces vibrations and adds a satisfying feel when closing the cover.
- Hinged mechanism. You no longer need to find a place to hang the cover or disconnect fan wiring when working on your printhead, thus extending the life of your fan connector.
- Fan cable management. Reduces strain on the cable and maintains a clean look.
- Magnetic fan cover. Easily customize your printhead with this attachment—whether it’s your favorite superhero logo or a cool-looking velocity stack. The sky is the limit.
- Doesn’t interfere with the PTFE tube. No need to print a PTFE guard attachment. Reduces forces on the cover and extends the life of your tubing.
- Perforated back cover. Provides better cooling for the PCB and extruder stepper motor.
- Stiffer back cover screw mounts. No need to overtighten the screws. The back cover has built-in stiffeners, so you won’t break it when tightening them.
- Even lighter weight. Weighs 22 g compared to the stock 54 g—a ~10% reduction in total moving mass. Extends the life of your steppers and reduces vibrations (theoretically).
- Three different printing profiles for ABS, ASA, and PETG.
- Better tolerances compared to other models. Everything clicks into place like the original.
Requirements:
- 10× 4 × 1.5 mm disc magnets (or 4 × 2 mm)
Installation:
- Read the notes below before printing.
- Print both the front and back covers.
- Insert two magnets per hole in both the front and back covers. Make sure to check the magnet polarity; otherwise, they won’t work. Glue is not required, but you may use superglue if desired.
- Install the back cover using the original four screws. Do not overtighten the screws—stop when you feel slight resistance to maintain proper alignment of the hinges and magnets.
- Install the fan and ducts onto the front cover. Use the cable management features for the fan wire.
- Install the front cover. It should snap into place. Ensure the hinge holes on the front and back covers are properly aligned.
- Insert 15 mm filament pieces into the hinge holes. Leave 3–4 mm protruding from both the top and bottom so you can easily remove the filament when taking off the front cover in the future.
- Attach the fan wire connector.
- Optional: Insert two magnets for the magnetic fan cover into their designated holes on the front cover.
Notes:
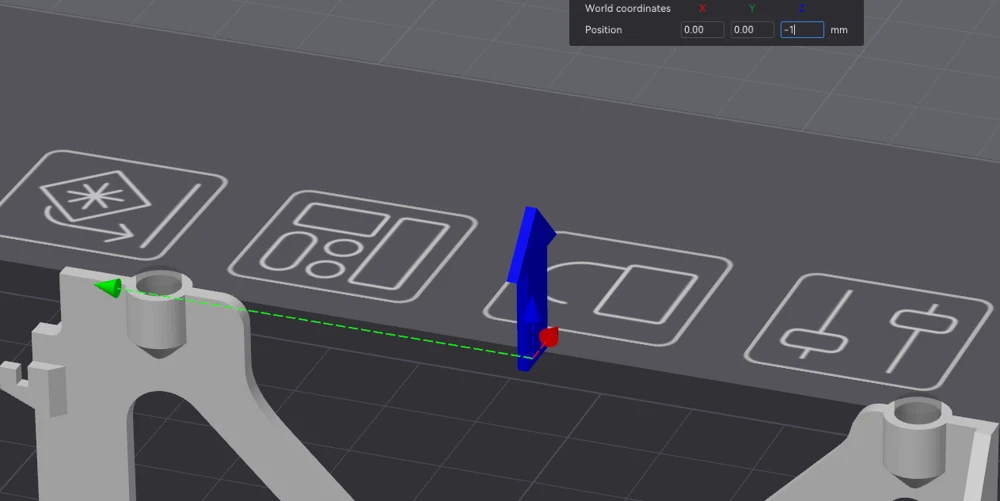
- The printing profiles include adjustments for magnet size. The default settings are for 4 × 1.5 mm magnets. If you are using 4 × 2 mm magnets, move objects Mount_Magnet #1, #2, #3, and #4 downward by 1 mm, as shown in the image below.
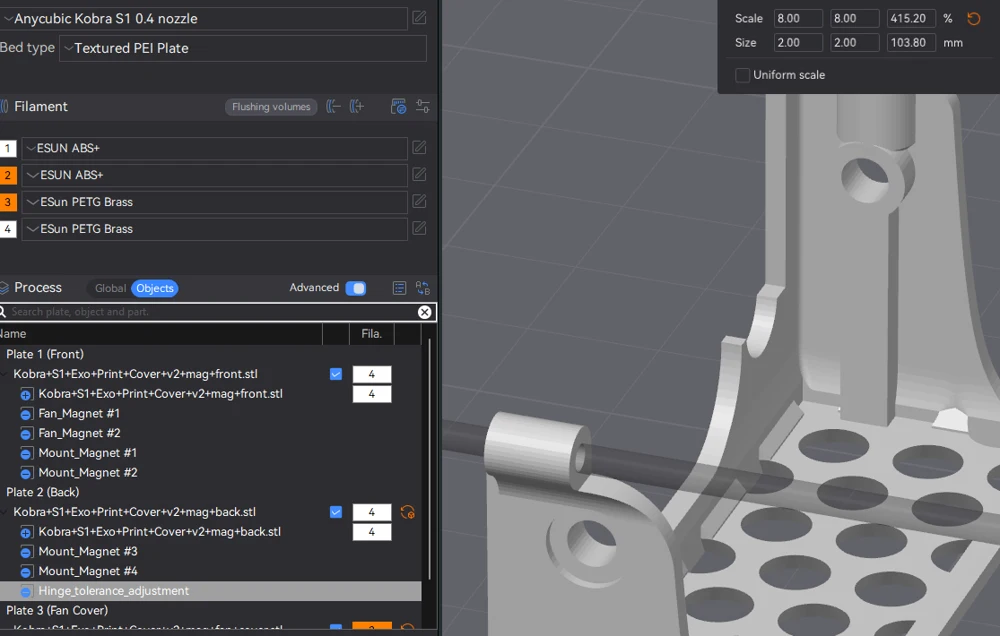
- If the hinge holes are too tight, you can scale Hinge_tolerance_adjustment as shown in the image below. The default value works well with properly calibrated filaments.
- If you do not want the fan cover magnet holes, you can remove objects Fan_Magnet #1 and Fan_Magnet #2.
- The default fan duct may slightly interfere with the heat block on the stock hotend when opening and closing the front cover. Slightly rotating the hotend 45° clockwise worked well for me.
- The fan duct model shown in the images can be found here.
CHANGELOG:
v2.1:
- Enhanced model rigidity by optimizing truss cross-section.
- Can now add more magnets up to four 1.5mm magnets or three 2mm magnets per hole. More clamping force for high speed printing.
- Easier to print overhangs.
- Fixed dimensional inaccuracy for fan and duct stand-offs.
Tags
License
Standard Digital File License
This work is licensed under the Standard Digital File License.
You are prohibited from sharing, sub-licensing, selling, renting, hosting, transferring, or distributing the digital file or 3D printed versions of this object, as well as any other derivative work in either digital or physical form (including remixes).You are not allowed to use the objects in any manner that involves charging money or collecting fees without permission.
You are prohibited from sharing, sub-licensing, selling, renting, hosting, transferring, or distributing the digital file or 3D printed versions of this object, as well as any other derivative work in either digital or physical form (including remixes).You are not allowed to use the objects in any manner that involves charging money or collecting fees without permission.
Comments & Ratings
Here is empty
Remixes

