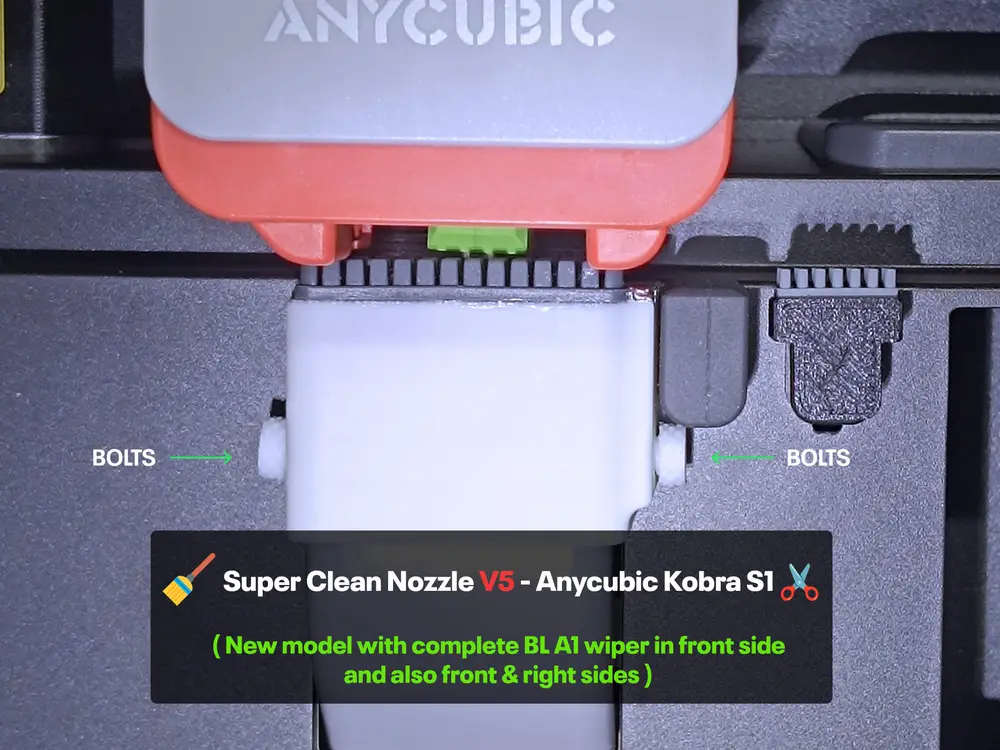
Super Clean Nozzle Kobra S1 - Version 5


Introducing Version 5 - 28/12/2025
Following feedback from "kke", the semi-circular cut is removed from the support part of the models with front wiper and with front and side wiper (trays 01 and 02).
Introducing Version 4 - 20/08/2025
Following requests from @Trig0r and @Nanuk74, I implemented a slight improvement in the front wiper support area and internal structural reinforcements with chamfers and created an additional version in another tray with a double wiper (front and side in the same piece).
Version V4 is an improvement on V3, but V3 is fully functional (it's the one I've been using personally for the past two months). Users who have had issues printing the front wiper support area with V3 should be able to print V4 without any issues.
Introducing Version 3 - 19/07/2025
A new model with the complete BL A1 Wiper is included on the front of the Super Clean Nozzle to 100% prevent any filament purge from reaching the tray.
This new model meets the specifications of previous versions and is Plug&Play without the need to remove the internal cutting blade from the purge bucket.
Support settings have also been improved to reduce filament consumption when printing any of the versions included in the 3mf file.
The small wiper on the right side seen in the first photo is the "Anycubic Kobra S1 Nozzle Wiper" model from kke.
Introducing Version 2 - 02/07/2025
I've created a new version of the Super Clean Nozzle (version 2) with some fixes and improvements.
1. The inner legs are now shorter so they don't get in the way of the purge scoop.
2. The right side has been adjusted more closely against the silicone, and screws have been added on both sides to tighten and hold the Super Clean Nozzle firmly.
3. The print layer height setting for the screw threads has been changed to 0.8.
ASSEMBLY:
1. Screw loosely tighten the left bolt into the Super Clean Nozzle. The left screw is the smallest (2.5 mm).
2. Leave the right bolt unsealed.
3. Place the Super Clean Nozzle all the way down into the purge bucket. Make sure it's properly seated and aligned with the line background.
4. Now that you've placed the Super Clean Nozzle in position, you can insert and screw the right bolt into its thread. Tighten both bolts until everything is secure.
Description:
The purpose and function of this part is to prevent purges from passing through the drain bucket to the build plate, thus preventing nozzle saturations (both the tip and the print head) and potentially causing "Venoms."
The rectangle or indentation on the right is for attaching a silicone wiper or wiper from a Bambulab A1 (the wiper must be cut in half and fitted into the gap).
The inner center section, which resembles a U, has a diagonal edge internally to act as a blade. The zigzag blade, or metal plate, of the purge bucket that comes standard, fits inside the object smoothly and without forcing it. There's no need to remove this metal plate.
It's custom-made to be plug and play, with very tight tolerances (you need a little force to get it in) so it stays firmly in place, doesn't rise in the fan's air currents, and is easy to install and remove. When printing, the supports must be active; a 30% infill ensures weight and strength, and slowing down the first layer ensures proper adhesion.
To prevent anything from sticking, I've lined the top and inside with aluminum tape, the kind used to cover and seal ventilation and air conditioning pipe connections, and it can withstand extremely high temperatures. This ensures that the PLA or other materials I purge don't stick and flow down the drain and correctly into the purge bucket.
If you use this object, please make sure it's properly positioned and aligned with the purge bucket. Failure to do so can cause problems. By printing and using this object, you are aware of the risks involved, and therefore, I disclaim any liability for any errors.
Before sharing this design, I tested its functionality with my own printer, including printing, leveling, and moving the heated bed without any issues.
I hope you find it useful, and if you like my design, don't forget to give it a like or comment on any details.
Español
Presentación de la versión 5 - 28/12/2025
Tras el feedback de "kke" se retira de la parte de apoyo el corte en forma de semicirculo de los modelos con wiper frontal y con wiper frontal y lateral (bandejas 01 y 02).
Presentación de la versión 4 - 20/08/2025
Tras peticiones de @Trig0r y @Nanuk74 implemento leve mejora en la zona de apoyo del wiper frontal y refuerzos de estructuras interiores con chaflanes y creo una versión adicional en otra bandeja con doble Wiper (frontal y lateral en la misma pieza).
La versión V4 son mejoras de V3, pero V3 es totalmente funcional (es la que llevo usando personalmente desde hace dos meses). Los usuarios que hayan tenido problemas al imprimir la zona de apoyo del Wiper frontal con la V3, deberían poder imprimir la V4 frontal sin problemas.
Presentación de la versión 3 - 19/07/2025
Se incluye un nuevo modelo con el Wiper completo de una BL A1 en la parte frontal del Super Clean Nozzle para evitar al 100% que cualquier purga de filamento llegue a la bandeja.
Este nuevo modelo cumple las particularidades de las versiones anteriores y es Plug&Play sin necesidad de quitar la cuchilla de corte interna del cubo de purgas.
También se mejoran los ajustes de los soportes para reducir consumo de filamento al imprimir cualquiera de las versiones incluidas en el fichero 3mf.
El wiper pequeño del lateral derecho que se ve en la primera foto es el modelo "Anycubic Kobra S1 Nozzle wiper" de kke.
Presentación de la versión 2 - 02/07/2025
He creado una nueva versión del Super Clean Nozzle (versión 2) con corrigiendo algunos aspectos y añadiendo algunas mejoras.
1. Las patas interiores ahora son más cortas para que no entorpezcan a la pala de recogida de purgas.
2. Se ajusta más el ancho del lateral derecho contra la silicona y se añaden tornillos a ambos lados para poder apretar y sujetar firmemente el Super Clean Nozzle.
3. Se cambia el ajuste de la altura de capa de impresión a 0.8 para las roscas de los tornillos.
MONTAJE:
1. Enrosca levemente el tornillo izquierdo en el Super Clean Nozzle. El tornillo izquierdo es el más pequeños (2.5mm).
2. Deja el tornillo derecho aún sin colocar.
3. Coloca el Super Clean Nozzle en la cubeta de purga hasta abajo. Asegurate de que esta correctamente colocado y alineado con respecto al fondo.
4. Ahora, tras haber colocado el Super Clean Nozzle en su posición, ya puedes colocar y enroscar el tornillo derecho en su rosca. Aprieta ambos tornillos hasta que todo quede bien sujeto.
Descripción:
La intención y funcionalidad de esta pieza es evitar que algunas purgas lleguen a pasar del cubo de drenaje a la placa de construcción y evitar así que se den también saturaciones del nozzle (de la punta y el cabezal de impresión) y se puedan dar casos de "Venoms".
El rectángulo o hendidura que tiene a la derecha es para colocar un limpiaparabrisas o wiper de silicona de una Bambulab A1 (se debe cortar por la mitad el wiper y encajarlo en ese hueco).
La parte central interna que parece como una U está hecha internamente con un borde diagonal para que haga de cuchilla. Y la cuchilla en zigzag o placa metálica del cubo de purga que viene de serie, encaja dentro del objeto sin problemas y sin forzarla. No hace falta quitar dicha placa metálica.
Está hecho a medida para que sea plug and play, con tolerancias muy ajustadas (hay que hacer un poco de fuerza para que entre) para que se quede en su sitio firmemente, no se eleve con las corrientes de aire del ventilador y sea fácil de poner y de quitar. Al imprimirlo, es necesario que estén activos los soportes, un infill de 30% garantiza que pesa y sea robusto y bajar la velocidad de la primera capa asegura que se adhiera correctamente.
Para que no se adhiera nada, he forrado la parte superior e interior con cinta de aluminio, la que se usa para forrar y cerrar conexiones de tuberías de ventilación y de aires acondicionados y que aguanta altísimas temperaturas. Así me aseguro que el PLA que purgue u otros materiales, no sé queden pegados y bajen hasta el desagüe y lleguen correctamente a la cubeta de purga.
Si usas este objeto, por favor aseguraros de que este correctamente colocado y quede alineado con el cubo de purga, si no está correctamente insertado puede ocasionar problemas, al imprimir y usar este objeto, sois conscientes de los riesgos y por ello, descargo mi responsabilidad ante cualquier fallo.
Antes de compartir este diseño, he testeado su funcionamiento con mi propia impresora, he procedido a realizar pruebas de impresiones y nivelación y movimientos de la cama caliente, sin problema alguno.
Espero que os sea útil y si os gusta mi diseño, no os olvidéis de darle al like o comentar cualquier detalle.
You are prohibited from sharing, sub-licensing, selling, renting, hosting, transferring, or distributing the digital file or 3D printed versions of this object, as well as any other derivative work in either digital or physical form (including remixes).You are not allowed to use the objects in any manner that involves charging money or collecting fees without permission.