
KOBRA-3 ACE OVERHEAD MOUNT V2


IMPORTANT: This model is for V2. A NEW VERSION - THE ULTIMATE VERSION HAS BEEN RELEASED.
THE MOUNT ALSO WORKS WITH THE NEW KOBRA 3 V2
DISCONTINUANCE OF SUPPORT - PLEASE BE INFORMED THAT I NO LONGER WILL BE PROVIDING SUPPORT FOR THIS MODEL AND I WILL NOT RESPOND TO PM OR TO POSTS AND COMMENTS FOR THIS MODEL.
- I AM SORRY TO HAVE TO DO THIS BUT UNFORTUNATELY I DO NOT HAVE THE TIME TO PROVIDE INDIVIDUAL SUPPORT TO EACH PERSON THAT DOWNLOADS THIS MODEL. THANK YOU FOR YOUR UNDERSTANDING
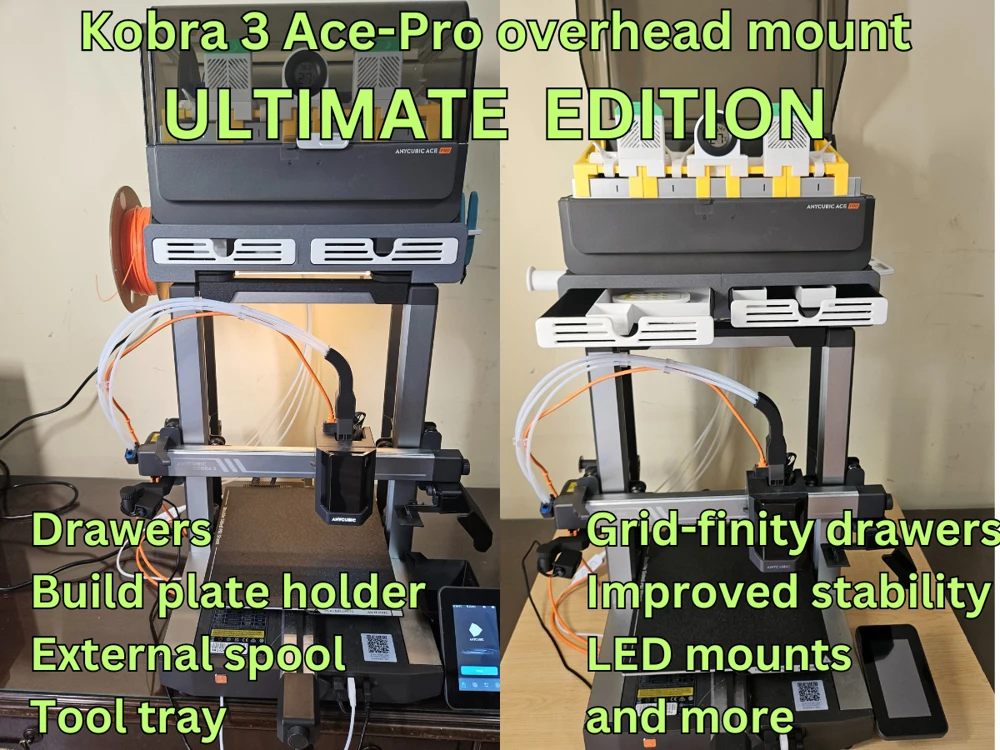
The Ultimate version offers all of the features of V1 and V2 with the following improvements:
- Two large drawers with GRID-FINITY style compartments (the compartments can be downloaded for free on Makeronline);
- Build plate holder for two or more buildplates;
- Side mounted tool tray (can be can be downloaded for free on Makeronline);
- Side mounted External spool holder (can be downloaded for free on Makeronline);
- LED clips for mounting LED under the Ace-pro overhead mount;
- Re-designed and improved rear extension feet for improved stability;
- Dovetail mounts the sides of the bottom brackets for custom add-ons.
- No external hardware or glue needed for assembly (this is optional)
CLICK FOR LINK TO ULTIMATE VERSION.
IMPORTANT: PLEASE READ THE DESCRIPTION AND INSTRUCTIONS
Important: Changelog: Check back here before printing to see if there are any last minute changes or modifications.
Design
The Ace overhead mount allows you to mount the Ace over the Kobra-3 to save space and for easier overall access.
Changes V1 to V2
V2 improves upon V1 with the following additions:
- Revised part fit and tolerances based on user feedback. Parts are now looser fitting;
- LED mounting clips and pre-placed holes on the underside of the top shelf (see link below for LED sourcing);
- Cable clips on post to allow for cable management
- Cable clips on the underside of the top shelf to avoid dangling wires;
- Camera mount on the underside of the top shelf (for future use);
- Mounting holes on the side of the top shelf (for future use - ex. tool trays, hot end and nozzle storage etc.)
- Future proofing for future add-ons
- The V1 KOBRA 3 - BOLT DOWN FOOT PAD work for V2 as well
For V1 owners - There is no need to reprint your overhead mount. Please note:
- The top shelf, bottom post, middle post and 45 degree posts are not interchangeable with V2 as the shape of the fit has been changed in V2.
- The cable clips can be mounted on V1 on the underside of the top shelf or the posts. There are two types of cable clips. A 0.135-0.140 inch drill works well for both and the cable clips will snap in that hole.
- For the LED clips you need to use a 1/2" no. 6 wood screw and it will self-tap the underside of the top plate.
- If you wish to add mounting holes, When I have add-ons I will provide a template that can be used to drill a hole to accept a 1/4 inch or 6mm bolt to fix a tray to the top shelf.
Instructions and notes
- See the photos for assembly of the main unit.
- You will need 2 no.8 3/4 inch long flat head screws (Metric size would be 4.0 x 20 mm) to assemble both top plates together.
- There are two types of cable clips. One for flat ribbon cables and another for USB sized cables. The flat ribbon clips are for the underside of the top shelf and the USB sized clips are for the rear posts (see photos). The ribbon clips insert into the holes in the underside of the top shelf. The USB sized clips insert into the back posts.
- The mounting holes on either side of the top shelf are for future use (ex. nozzle, hot end and tool trays)
- The mounting brackets on the underside of the top shelf are for a future camera mount.
- There are two kinds of LED clips. The larger ones go at the front. Careful with clearance for the front LED. For the LED clips you need to use a 1/2" no. 6 wood screw. You can also use two way tape to glue the LED strips but may have issues for the front one.
- Makeronline may soon offer a LED kit for the Ace overhead mount. In the interim, this is the LED that I am using. Click for Amazon Link USA I was informed that this model also works and is available for Amazon EU users. Click for Amazon EU link
Additions and useful parts
- The following upgrade may be useful: KOBRA 3 - ACE BOWDEN TUBE GUIDE Click for Link
- The following upgrade may be useful if the rear of the Overhead mount is near a wall : KOBRA 3 TO ACE CABLE PROTECTOR - GUARD Click for link
- If you want bolt down pads for the Kobra-3: KOBRA 3 - BOLT DOWN FOOT PAD Click for Link
- An improved poop-bin. IMPROVED KOBRA-3 POOP BIN Click for Link
- I uploaded a model for a set of anti-tilt rear brackets. These are optional but may provide some additional peace of mind. Click for Link
- Here is a link for a side mount support to store your hot ends. Click for Link
- I uploaded a model for an improved adjustable camera for the stock Anycubic USB camera. Its angle can be adjusted. Click for Link
- I uploaded a set of side trays and bins for the Ace Overhead mount - version 1 and 2 to store nozzles, hot ends and tools. Click for link
- Added a top camera mount that mounts on the underside of the ACE overhead mount top shelf. Click for link
- Here is a link for a handy side mount support upgrade to store your cutter. Click for Link
- Are you looking for a Dual Ace Stand? This is the link for my Dual Ace stand. The bottom Ace has rollers for easy roll-in and roll-out. Click for Link
- Rear Wall brackets - used to secure the Ace overhead mount to a wall. This is optional. Click for link
IMPORTANT: REMOVE BRIM FOR TOP PLATES OTHERWISE YOU MAY GET A MESSAGE ABOUT EXCEEDING PRINT DIMENSIONS
Printing profiles are provided.
- Check support and brim before printing - I do make mistakes from time to time!
- I printed using the default settings - 0.2mm and 15% infill. This is more than sufficient.
- You may want to print the Thumbscrews with 50% infill.
- The clips may require a brim.
DISCOUNT AND AFFILIATE CODES FOR PRINTER AND FILAMENT
I am continuously trying to get discount codes from various manufacturers. Unlike many affiliate links these give discounts on purchases and are more difficult to obtain. In my requests I ask that they give me the codes with the most discounts for users even if it means a smaller commission.
HOW TO USE THE CODES
1. You need to CLICK ON THE AFFILIATE LINK. The links are usually set up by countries/regions.
2. Add the items you want to purchase
3. Enter the DISCOUNT CODE at checkout. The codes vary by month and saving – so check back each month for the latest offers.
4. You can only use ONE CODE so be certain to enter the one with the most discount
Click here: Discount code link
$15 off – Darren3dPrint15
You are prohibited from sharing, sub-licensing, selling, renting, hosting, transferring, or distributing the digital file or 3D printed versions of this object, as well as any other derivative work in either digital or physical form (including remixes).You are not allowed to use the objects in any manner that involves charging money or collecting fees without permission.

